Just around the time I was getting ready to leave work today, the system administrator came with an urgent call. The Boss wanted his damaged Fujitsu Siemens Lifebook P7010 on a journey the following day, but the hard disk was damaged. Could I replace the hard drive, oh, and backup all of his private pictures too while I was at it? To me that’s the equivalent of asking: Do you still want to have a job tomorrow? But I braced myself and started looking online to find tips or instructions. All that I found was this forum post from user HG-SAT:
Yo tuve el mismo problema y la solución es sencilla;
1.- Quita la bateria
2.- Quitar los 3 tornillos de la parte delantera
3.- dar la vuelta y con cuidado quitar la tapa que tiene el touchpad
No hay que quitar más tornillos ni es nada complicado.
In english (inglispitinglis)
1.- Remove battery
2.- Remove the 3 screws from the front
3.- Turn on and remove the tape of the touchpad carefully
Is not necessary remove thekeyboard
That was all that I needed. The reviews and manuals I’d searched through only stated that if the sealed hard disk failed I would have to turn it in to a service center. No such option. The Boss wanted his lappie, breach of warranty or not. (Oh, and you may breach your warranty by following these instructions. If you’re not in a hurry, call your service center and check the warranty status of your system first. I cannot be held responsible for your actions, crimes, sexual fantasies or whatever. And if you’ve only got one hand, this procedure may prove a bit tricky.) Here we go:
1. Remove the power adapter and the battery, press and hold the power button for 10 seconds to rid potential current. Turn the laptop around, and remove the three front screws as indicated by the picture below. As you can see I have removed the optical drive too, but that’s not really necessary.

2. Turn the laptop around and with a small screwdriver just carefully pry off the palm rest. NOTE: the touchpad controller is right below, so be careful not to damage it with the driver or when you remove the palm rest. Mine fell off:

Here you can see where the touchpad controller is:

3. After a little bit of wiggling I found that the hard drive was not in fact attached by any means except for the IDE cable running to the motherboard. All you have to do is tilting it over to the right. Be careful not to ruin the cable or the wrapping:
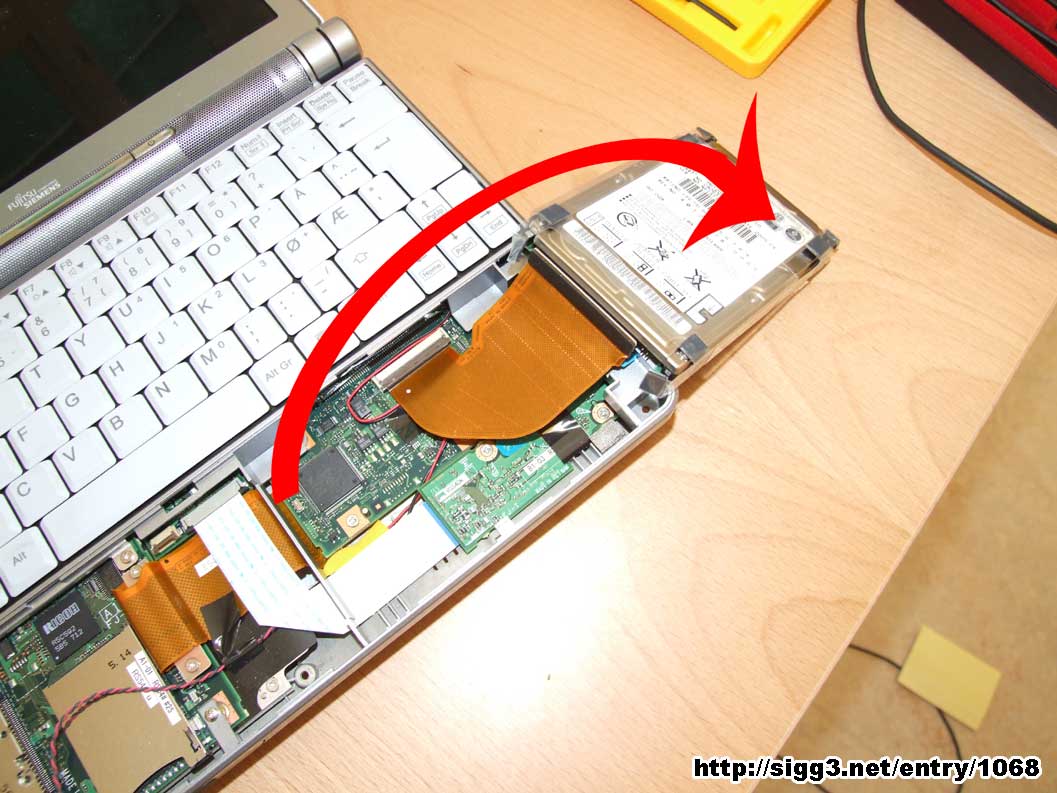
The wrapper. I guess this must be "advanced shock protection":

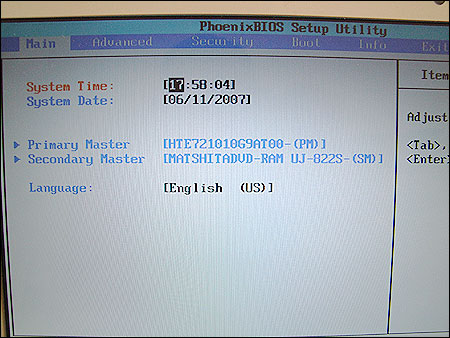
4. Replace the 2.5" HDD with your upgrade, connect it to the cable and slide the drive into the wrapper. Reverse the above steps, turn on the laptop, hit F2 for BIOS and check that the new HDD is registered.
Just to be safe, I tested the touchpad and the "mouse buttons" from a Knoppix LiveCD afterwards. Everything worked.
EDIT: 19th of February 2009
After a request I was able to find the P7010 Service Manual, P7010 disassembly manual and P7010 Assembly Manual in PDF format on Jail.se’s FreeBSD on Fujitsu P7010 page. I advice everyone to proceed with caution, but I really wish I had had those files when doing this procedure. I can also recommend reading the comments on this page (click comments below) to check out further tips or leave some feedback. Thanks!
Thanks to your post i just replaced now half-dead hdd in my p7010 ;> Thanks! :>
No problem:)
Credit goes out to HG-SAT forum user for his 3-line post that gave me the basic info. I just supplied my own photos from the process. It’s a sexy little machine, the P7010. Too bad it wasn’t mine:p
Hi, Thanks for your post. I’m trying to replace the keyboard on a P7010D and can’t figure out how to get in there. Help, anyone?
I haven’t replaced a keyboard on this model, so I can’t really tell you.
If I were you I’d check out the F-S notebook forum here: http://tinyurl.com/ywo85x
Good luck!
Woo go tech support!
Sigg3, can you help me reach Jesus? I just read your latest post and I think it set be back a bit.
Hi, your picture really helped me. You missed out 1 step. They should remove the CD/DVD before can see the third screw. Thank you for your post.
Actually I mentioned it in passing:
“As you can see I have removed the optical drive too, but that’s not really necessary.”
But thanks for stopping by!
Thank you for the info… just upgraded the HD in my P7010 to a 250Gb :-)
Thank you for this post, but unfortunately I can’t open all the pictures, please send me by email tel me how.
Sorry, Raphael, the pictures won’t be up until January 2008. Just hang in thight, while my cousin fix up the image server.
(Unfortunately a backup containing the images went down too:P)
This was great, thanks! I dropped my precious p7010 and wanted to reseat the hard drive but could find no information on how to get at it, aside from your blog post. Alas, my problem is not resolved but thanks anyway.
Eh! You’re in Norway, I didn’t realise. Norway is my favourite country in the WORLD…(my mother lives in Drammen)
It’s pretty good, yes. Sorry to say that Drammen is not my favourite place in the world :P
My best to your mother, and good luck with your work!
Thanks so much for posting these instructions with pictures. It made me a lot less nervous about the process being able to see what I would be seeing/doing step-by-step. Thanks!
Dude, my Fujitsu is quite old. 4 years old. So if I install a new hard disk, will the motherboard be able to support it? how can i tell if the motherboard can support?
To Hellboy
Short answer: See the specifications of the hard disks on the market versus the specifications of the original drive.
Long answer: Any 2.5" drives with 9.5mm thickness should do for the P7010. BUT (and that’s a big But) exceeding the speed limitations might produce unwanted heat and even instability. I’ve experienced this on several Dells where I put 7,200rpm drives into laptops that originally had 4,200rpm drive. Safe bet here is 5,400rpm, which is the same speed your original drive had.
As for data connections, being that your laptop is 4 years, you should go for IDE or PATA instead of SATA. See this picture and this page for comparisons. PATA is backwards compatible with IDE. Or rather: PATA is a synonym for IDE and ATAPI, while SATA is another technology entirely. SATA will not work with P7010.
Naturally this post only applies to the Lifebook P7010 model.
Yo tuve el mismo problema y la solución es sencilla;
[I had the same problem and the solution is simple;]
1.- Quita la bateria
[1.- Remove the Battery]
2.- Quitar los 3 tornillos de la parte delantera
[2.- Remove the 3 screws at the front (of the laptop)]
3.- dar la vuelta y con cuidado quitar la tapa que tiene el touchpad
[3.- Carefully turn it over (, open it,) and remove the touchpad cover (or – wrist rest & touchpad)]
No hay que quitar más tornillos ni es nada complicado.
[No need to remove more screws & its not complicated]
It was the author’s own translation I posted, but thanks anyway, Axi! :)
Thanks for this guide, I tried to find the hdd for 15min before finding your site :)
GREAT instructions! If anything, the detail make them seem intimidating, when the procedure is actually quite simple and easy.
Thanks alot.
Wow, just what I needed. I am not wizard and I don’t feel confident opening my latop, but with these instructions and images, piece of cake.
Thanks
Thanks very much for your post… someone gave me one of these laptops to try and recover the data from – and I couldn’t find the hard drive!! After finding your post it was a really quick job to get the hard drive out!
So thanks for your efforts. Much appreciated!
Thanks, you made my day! time to upgrade my sexy little P7010 : )
This is extremely useful to see – thank you for posting it. I don’t suppose you have any idea how to go about replacing a damaged screen on it, do you?…
I haven’t done so myself, and given the size of the thing I’d suggest being VERY CAREFUL.
If you can get a replacement kit and find the proper manual(s) on their support site, then you can certainly have a go. But you’re probably acting out-of-warranty!
I have only replaced LCDs on Dells..
I just found this that may help you, John. I wish I had those manuals when I started out:)
# P7010 Service Manual
# P7010 disassembly manual
# P7010 Assembly Manual
PDF files courtesy of Jail.se’s FreeBSD on Fujitsu P7010 page. Good luck!
Thank you SO much! That’s fantastic. (Although it also looks quite fiddly; even to just open it up and check the LCD panel part number.)
The machine is out of warranty anyway, of course. Don’t know whether I’ll be able to get a replacement LCD of the exact same type, however.
So far, suppliers will only say that one is available that is compatible. The one I have is such a good screen (although now cracked – tip of the month is don’t accidentally kneel on your small, unnoticeable laptop!) and it is only worth the expense of replacing it rather than buying a new machine if I can be assured of regaining that same quality…
These machines are clearly not meant to be serviced quickly (or by the end user).. It should work though, provided you get a compatible and working part and are REALLY CAREFUL when doing the swap. Maybe try opening it up first to see if you can do it at all. Make sure you have good lighting, peel slowly and see..
Hi, I have a 0260 system timer error on my p7010. It would seem I need to change the BIOS battery. What is the simplest way to get at it?
I want to avoid as much disassembly as possible. Any help would be a life saver.
If you see the disassembly manual he has completely removed the top covers in step 20. If the battery isn’t on the bottom side of the motherboard, that should be it. Of course, this is a complete disassembly manual, so you shouldn’t have to follow it verbatim, just make sure you don’t cut any connectors.
Were you able to get a replacement battery from F-S or does it suffice with a regular flat one?
in Fig 26 of the dissembly manual, is that the topside or underside of the board. The battery and its connector are visible in this figure. One silly question, the battery is the yellow flat thing with the red and black wires coming off it isn’t it? I’ve ordered one from a shop on ebay.
Compare fig 26 and 18. It is topside.
Yes, the battery is in a yellow casing in this picture. See Fig 32. Good luck, and be careful!
Thank you sooo much for this post and the photos. After a live chat with Fujitsu support I was ready to go out shopping for a netbook. My P7010 is 5+ years old but probably does not have more than a couple 100 hours of uptime. I was actually surprised the hard drive went but when I learned it was internal I didn’t know what to expect. After seeing your photos it took less than 5 minutes to get my hands on it. Will pick up a replacement tomorrow (following the guidelines for speed) and should be back in business a few hours later. Saved a bunch of money and no learning curve. Thanks again.
Good to hear, Jimski!
I have a problem, i removed hard disk. now when i mount it the pc not start. Video is balck and no soud… not start windows is all black hel meeeee
Either you did not put everything back where it belonged, or you damaged some part. My bet is that give windows is running but all black (??) you have forgotten to input the LCD cable between the motherboard and LCD or not inserted it correctly.
Good luck!
And you did put in a new hard disk drive? I’ll need more info to help you, Marco.
Thanks for putting this guide together! A great help.
Thanks for the well-detailed info. I had been trying to find a way into my P7010 for some time! Said P7010 now has a new working HDD and works perfectly thanks to your detailed instructions.
Many thanks and best regards.
Geoff
Thank you!
It’s an interesting little device to say the least. And very well-tucked:)
thanks for the complete guide…!
I’ve owned my P7010 since it was new – still works just fine. I pulled it out, put the batteries in (yes I have the two battery packs plus two extra) charged it up and good old outdated windows XP booted up.
I’ve since installed windows 7 with no major issues. I’m still trying to resolve the graphics driver but for now it’s fine. Next I will be installing a new hdd. I’m pretty suprised it works with no issues.
I always liked the size of this laptop. Way ahead of its time – and horribly expensive when it was new. I even have the origional box, all the recovery disks case and pretty much everything else.
I’d really like to install a less resource heavy OS like Linix but I doubt I would ever be able to source or write the sound, video, cardbus, wireless, NIC, touchpad, hotkey, and really – any other driver required to operate the computer.
It was a good machine for the time, very compact. It was the company CEO who had it in our business, looking all modern and high tech:)
I think it should work nicely on GNU/Linux, with the exception of weird peripherals (3/5-in-one card readers are hit and miss). Try a Ubuntu live disc/usb to see for yourself what works and doesn’t. You don’t have to install anything, but it allows you to test out what would work and how the (defaults) would look. Please note LiveCDs are a bit slower than real performance. Are you putting in an SSD now, or going for a HDD?