The FS Esprimo Mobile is a consumer-targeted and cheap laptop for light home use, emphasis on cheap, which arrived the market sometime in 2008 as far as I know. It comes with a 1 year warranty, as is only too normal when it comes to cheap devices (e.g. cheap hardware), so consider extending it if it’s not too expensive. A colleague of mine had managed to drop his machine on the floor resulting in a completely dead laptop. No sounds, LEDs lighting up, no beep/light codes, nothing. Naturally I figured it had something to do with the PSU and told him I would check it out. I couldn’t find an official disassemble manual online, only the regular user manual, so I decided to document the process. First a word of warning: I am not responsible for your own actions, whether you are taking the risk of opening your laptop or farting in the elevator. It’s all you. And if you have a warranty that still applies, please check whether actually using it is cheaper (probably is).

Before you do anything at all, disconnect the power adapter, remove the battery and press and hold the power button for 10 seconds. This is to make sure there is no remaining current in the system. A short-circuit can and will damage the motherboard and other EM sensitive parts and thereby cost you more money. That said, I hope you like to screw, because there is a lot of screwing to be done!
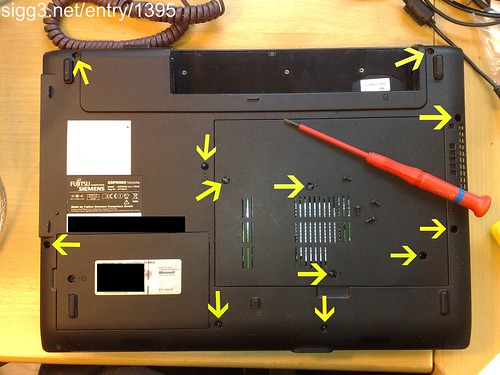
1. Remove the 12 screws as illustrated above (click for bigger version)
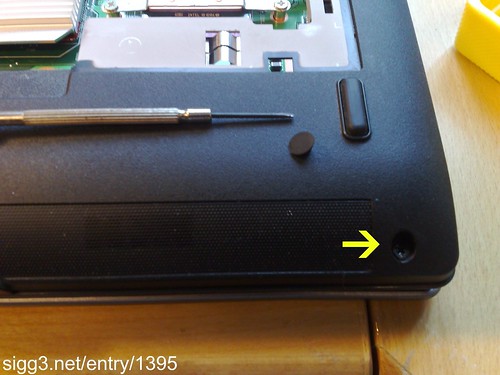
2. Pick out the rubber covering the 2 hidden screws on the front bottom. If you want to you can glue them back on when you’re done.
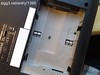
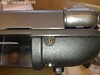
3. Remove the HDD cover (1 screw) and the small screw underneath it ( pic 1). Proceed to the two screws just below the LCD hinge cover (2). Then, using a small flat screwdriver wiggle up the two hinge covers (3).
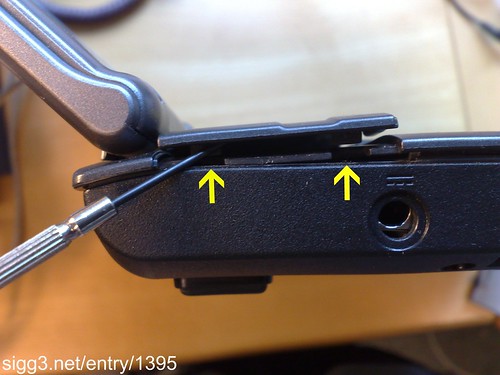
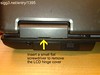
4. To remove the chassis top cover to get to the keyboard you will have to release the hinge cover, that is, the small piece of plastic running seamlessly across the machine between the keyboard and the LCD. This is attached by two hidden latches on either side (pictured above). When this is done you are ready to slide out the keyboard towards the monitor. Be careful not to pull it too long which will damage the keyboard control cable underneath! Place the keyboard while still connected on the palmrest face down.
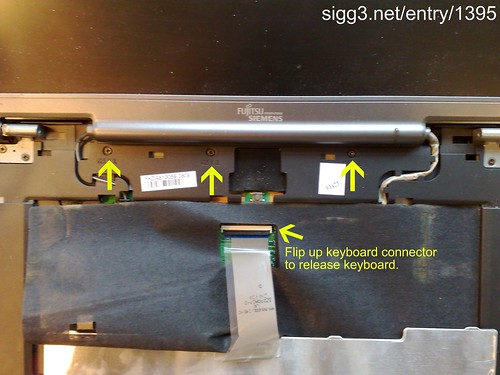
5. Still using a small flat screwdriver, flip up the keyboard connector, and remove the keyboard. Probably to reduce typing rattle FS has put some kind of cloth underneath the keyboard. At least I hope that’s what it’s for. Move it aside for the time being and remove the 3 screws just below the LCD.
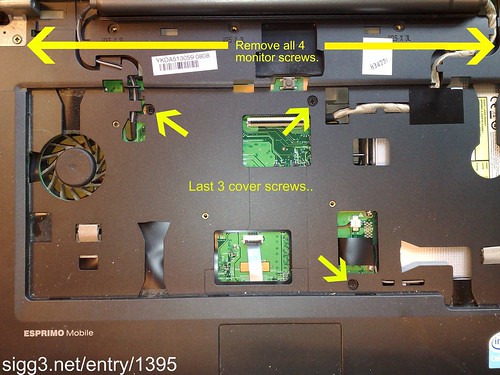
6. Remove the last 3 cover screws and then the 4 long screws keeping the LCD in place. When you remove a laptop LCD you should try to open it near the 180 degree angle so that it is easily removed and re-inserted. This varies among laptops however..
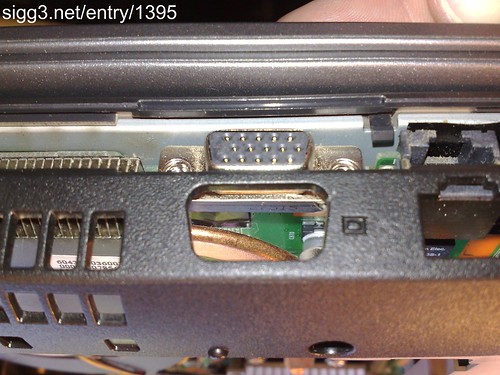
7. Use a flat screwdriver to carefully pry open the chassis. Make sure you don’t harm any of the connectors, and since the VGA connector on this model is built into the plastic, you must make sure to bend the plastic around it. Be careful not to break either!
Congratulations! That’s it! You can now access the entire motherboard and all of its components, and as I soon I got to this stage I discovered that the PSU connector had broken completely off.. Not from the process above of course, but the clumsiness of my colleague. The laptop had landed on the power adapter in the PSU connector thus breaking its inner counterpart in two pieces. Which means coughing up the cash for a new motherboard most likely. But in that case I’ll at least know where to begin!
I urge you to click the links I’ve provided throughout this post because I couldn’t put up all the pictures on my front page. You can also go and see all of the pictures together on this flickr page. When you’re done replacing your part(s) you just retrace your steps from above. Please remember that if you’re only swapping out RAM modules or changing the hard disk drive there is absolutely NO REASON to disassemble the entire laptop. It is only required for a few protected parts like the PSU. Good luck!
Thanks for this, saved me loads of time… broken power connector here too.
thank you veru helpful
hi there
would you happen to have any pics of screen removal for this laptop ? i think im gonna struggle if i try & wing it..! many thanks
baz
Steps 1 through 6 will allow you to remove the monitor.
hi, really helpful instructions. We have the same problem with my son’s Esprimo v5535, no power at all. Have tried replacement power supply. Have stripped down laptop as far as your instructions, can see no sign of damage, has not been dropped as far as I know. I am going to leave it tonight, but any ideas what else to look for ? Fuses, switches. A photo of the broken PSU connector would be REALLY useful. thanks again, Alex
@Alex: There’s a few more pics at the flickr set page V5535 disassembly, last one feat. the broken PSU connector.
Hope this helps!
I have a broken headphone socket, Can you access it with this procedure ?
Thhank you
I would guess so, but I don’t remember exactly where it’s seated. But it’s probably on the mobo, so you’re gonna have to open it pretty much anyway.
alex: There’s a fuse soldered next to the power connector. At least on my v5535. This might be broken. I just figured out after not finding anything else broken…
Anywayz, good walkthrough on tearing apart, saved me a lot of headackes!
Thanks
Brilliant! I dropped $3.50 on a bogus website that promised to send me a service manual and never did. Then I find this for free! 40 minutes later the crack in the tab on the power connector is discovered and fixed, and my daughter can get her geography course work in in on time. Thank you. Thank you.
@Roy: Congratulations! Maybe you’d be so kind to reveal how you fixed it?
Worked beautifully, damaged power connector replaced FS lives again. Many thanks.
Great!
Care to share with us how to proceed. Feel free to drop it in an e-mail and I can do a write-up.
Thank you – that was must helpful – saved a lot of worry about missing the odd screw and breaking something
That’s right, Bob! I’m better than Valium & Viagra:)
thanks for this info its helped me out alot. i am going to attempt to replace the fuse on the motherboard, does any1 know what type of fuse is required, also i read that there is a mosfit to replace as well check the url for more info
forget my last post it would seem the mobo has had it due to a burnt track on a pin that the dc socket solders too so unless i can find out where that track goes its buggered, any ideas ????
Sorry, man, that’s beyond my capabilities:) Good luck!
Update: i have found a service manual and circuit diagram made by a company called Inventec Corporation, its very detailed and means nothing to me but i have spoken to my local pc shop and they reckon with that info they will be able to bypass the track inside the circuit board with a single wire and hopefully that will fix it. if any 1 needs the service manual or circuit diagram let me know and i will upload it
Nice! Share the URL here (if you use megaupload or something)!
im used to using bittorrent can i email u the pdfs please
Sure, send me an e-mail on the CONTACT page, and I’ll get back to you. Mind if I host them here?
no you can do what you like, there really hard to find so they need to be put out there, i had to sign upto some music site to get the service manual. but it was worth it although what you have here is ideal
I haven’t received anything yet..? Maybe you could upload to megaupload or something?
the fuse ya need is a fs5a smd ya can get them from here in the uk
http://dc-jack-socket.com/index.php?main_page=product_info&cPath=75&products_id=152
i replaced the fuse on mine but it burnt out as soon as i pluged in the adapter so i put a bit of 5amp fuse wire across it and now when i plug in the ac adapter it drops the voltage at the jack from 18.9 to 3.9 so got bad power somewhere on the board